First off, you should download the program at either github or from sqnya.se. Anywhere else and i can't gurantee that it's not malicious. Next...
Start up the program. You should see an empty white square canvas in front of you. Your OS might ask you to permit parupaint to use your network, in which case you should say yes if you want to draw collaboratively.
Parupaint was designed to make use of having the keyboard placed in front of your tablet. For a right handed person, this would mean placing the tablet to the right, and using the keyboard with the left hand. The keys are all customizable if you wish to change any of them.
Parupaint is a bit different from usual painting programs. The most obvious one is the (very) unusual interface compared to regular painting programs: no toolbars, no menus. At first this is very confusing, but that's normal. The program is almost entirely controlled by keys, so learn them by checking out the keyboard reference on the homepage. You might also assume that there exists an undo action, which, at the moment, doesn't exist!
When saving as a project, parupaint uses its own project format: ppa (think .sai or .psd). Be aware that you quicksave as png, so you have to explicitly save as ppa.
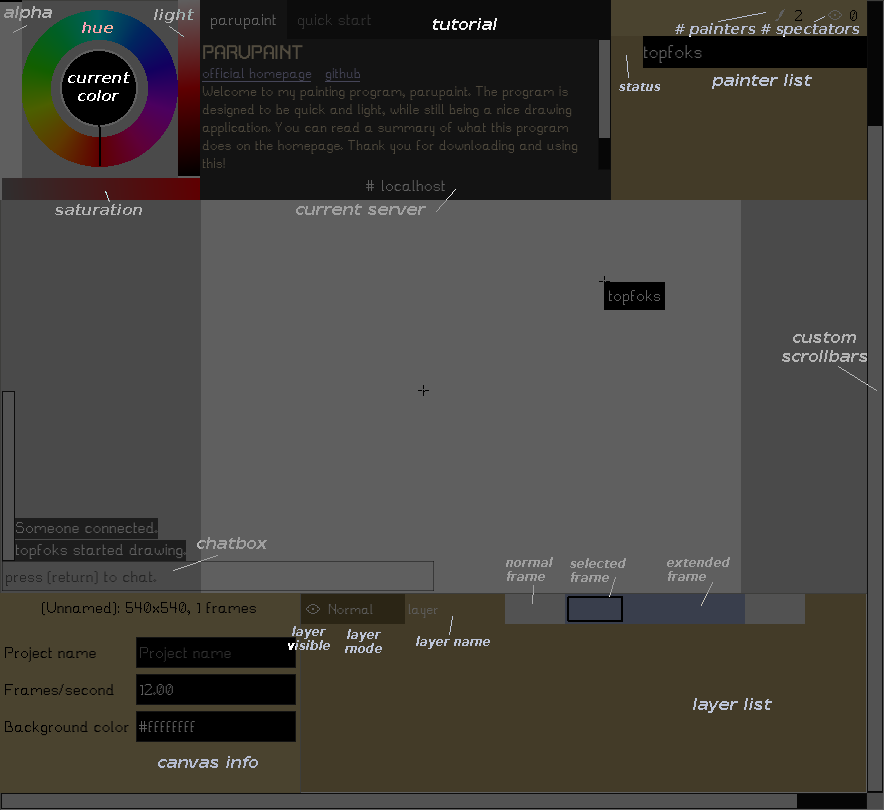
Parupaint works with layers and frames. There can be many layers, and in each layer there can be many frames. These compose the final animation when rendered. Frames can be extended and redacted, meaning that the frame is "stretched out", useful for things like static backgrounds. You can ignore the frame stuff if you don't care about animation.
The overlay is basically the main interface - where you change color, see layer/frame information, and chat. It can be shown with Tab and hidden with Shift+Tab. The overlay will hide automatically after some time, unless you hover over one of the controls.
Brushes work differently than how normal painting programs does. Each brush is customizable (color, size, tool) and keeps the settings through program restart. Even the eraser is a brush by itself. The eraser can be toggled globally with E from any brush, and then toggled back to the previous brush. The main brush is at B. If the color alpha is 0.0, the brush is treated like an eraser (destination-out) and is shown with a dashed outline.
Navigating layers and frames is done entirely with keys, so it can be a bit disorienting sometimes. Check the bottom part of the overlay to see which layer/frame you are on.
Other helpful keys:
A prominent feature in parupaint is the ability to draw collaboratively! This is made possible by designing the program around a server/client model. This means that when you're drawing alone, you're actually just drawing in your own server. (like what the statusbar says: "connected to yourself"). For security, your session is passworded by default, and anyone wishing to join you has to enter it. The password can be disabled in the settings.
To have someone join in with you, first, find out your ip. Then make sure you have the default port open (1108). If you are behind a router, you probably have to port forward (TCP 1108) before others can join you. If everything is set up, ask them to open up connection dialog (Ctrl+I) and enter your IP in to the host line entry. Once they connect, they can join in, and congrats, you both are now drawing together!
Feel free to check out the public server (the "sqnya.se" button) as well! But be respectful to your fellow artists.
The program can make use of the ffmpeg libraries to export to a lot of other formats, including videos. I'll write a tutorial for this some other day...
Thanks for trying out my program!